In this article we will install and configure our DevOps server. It will host a Nexus repository which stores your deployable artifacts and third-party dependencies, a Jenkins server which will build, test and deploy your applications, and a version control repository (optional) which will contain all your source code. I prefer Atlassian BitBucket, but if you are looking for a free option, GitLab would be my choice #1.
https://about.gitlab.com/installation/$centos-7
Before we begin, let’s assume you have a CentOS 7 Linux installed and configured.
Since Jenkins will be running MUnit tests, the Java version must meet Mulesoft requirements and the recommended version. For the purpose of this exercise, we will be using the latest release of the Oracle JDK 1.8.
Installing Java
Uninstall OpenJDK completely:
 $ rpm -qa | grep java

java-1.8.0-openjdk-headless-1.8.0.171-7.b10.el7.x86_64

java-1.8.0-openjdk-1.8.0.171-7.b10.el7.x86_64

java-1.7.0-openjdk-headless-1.7.0.181-2.6.14.5.el7.x86_64

java-1.7.0-openjdk-1.7.0.181-2.6.14.5.el7.x86_64


$ sudo yum remove java-1.8.0-openjdk-headless-1.8.0.171-7.b10.el7.x86_64 java-1.8.0-openjdk-1.8.0.171-7.b10.el7.x86_64 java-1.7.0-openjdk-headless-1.7.0.181-2.6.14.5.el7.x86_64 java-1.7.0-openjdk-1.7.0.181-2.6.14.5.el7.x86_64
Install Oracle JDK 1.8 latest release (8u172). IMPORTANT – full JDK, not just JRE.
$ sudo rpm -i jdk-8u172-linux-x64.rpm

$ java -version

java version "1.8.0_172"

Java(TM) SE Runtime Environment (build 1.8.0_172-b11)

Java HotSpot(TM) 64-Bit Server VM (build 25.172-b11, mixed mode)
Installing Maven
In order to be able to build our projects using Jenkins, we’ll need Apache Maven installed on our server. Simply open https://maven.apache.org web site in your browser, proceed to the Downloads page and download the latest version of Maven packaged as a TAR.GZ file. As of this writing, it is apache-maven-3.5.3-bin.tar.gz.
Unpack the Maven package to the
/opt
directory:
$ sudo tar zxvf ~/Downloads/apache-maven-3.5.3-bin.tar.gz
I usually create a generic symbolic link to the latest version:
$ sudo ln -sf apache-maven-3.5.3 apache-maven
Installing Apache Tomcat
Download and install Apache Tomcat:
$ cd /opt/

$ sudo tar zxvf ~/Downloads/apache-tomcat-9.0.8.tar.gz
Create a generic symbolic link to the latest version:
$ sudo ln -sf apache-tomcat-9.0.8 tomcat
For security purposes, Tomcat should be run as an unprivileged user (i.e. not root). We will create a new user and group that will run the Tomcat service.
First, create a new tomcat group:
$ sudo groupadd tomcat
Then create a new tomcat user. We’ll make this user a member of the tomcat group, with a home directory of /opt/tomcat, and with a shell of /bin/false (so nobody can log into the account):
$ sudo useradd -M -s /bin/nologin -g tomcat -d /opt/tomcat tomcat
Change to the Tomcat installation path:
$ cd /opt/tomcat
Give the tomcat group ownership over the entire installation directory:
$ sudo chgrp -R tomcat /opt/tomcat /opt/apache-tomcat-9.0.8
Also give the tomcat group write permissions to the tomcat directory:
$ chmod g+w /opt/tomcat
Next, give the tomcat group read access to the conf directory and all of its contents, and execute access to the directory itself:
$ cd tomcat/
 $ sudo chmod -R g+r conf
 $ sudo chmod g+x conf
Then make the tomcat user the owner of the webapps, work, temp, and logs directories:
$ sudo chown -R tomcat webapps/ work/ temp/ logs/
Because we want to be able to run Tomcat as a service, we will set up a Tomcat systemd unit file.
Create and open the unit file by running this command:
$ sudo vi /etc/systemd/system/tomcat.service
Paste in the following script. You may also want to modify the memory allocation settings that are specified in CATALINA_OPTS:
# Systemd unit file for tomcat
 [Unit]
 Description=Apache Tomcat Web Application Container
 After=syslog.target network.target

 [Service]
 Type=forking

 Environment=JAVA_HOME=/usr/java/latest
Environment=CATALINA_PID=/opt/tomcat/temp/tomcat.pid
 Environment=CATALINA_HOME=/opt/tomcat
 Environment=CATALINA_BASE=/opt/tomcat
 Environment='CATALINA_OPTS=-Xms512M -Xmx1024M -server -XX:+UseParallelGC'
 Environment='JAVA_OPTS=-Djava.awt.headless=true -Djava.security.egd=file:/dev/./urandom'

 ExecStart=/opt/tomcat/bin/startup.sh
 ExecStop=/bin/kill -15 $MAINPID

 User=tomcat
 Group=tomcat
 UMask=0007
 RestartSec=10
 Restart=always

 [Install]
 WantedBy=multi-user.target
Save and exit. This script tells the server to run the Tomcat service as the tomcat user, with the settings specified.
Now reload Systemd to load the Tomcat unit file:
$ sudo systemctl daemon-reload
Now you can start the Tomcat service with this systemctl command:
$ sudo systemctl start tomcat
Check that the service successfully started by typing:
$ sudo systemctl status tomcat
If you want to enable the Tomcat service so it starts on server boot, run this command:
$ sudo systemctl enable tomcat
Installing Jenkins
Download Jenkins as a Generic Java Package (.war) and copy the war file to the tomcat webapps directory:
$ sudo cp ~/Downloads/jenkins.war /opt/tomcat
You may tail the tomcat log file and see that jenkins is successfully deployed:
$ tail -f /opt/tomcat/logs/catalina.out
After a while, the following text should appear in the log:
*************************************************************

*************************************************************

*************************************************************


Jenkins initial setup is required. An admin user has been created and a password generated.

Please use the following password to proceed to installation:


c1bb9e995381421fbe357d04e7e2fc1a


This may also be found at: /opt/tomcat/.jenkins/secrets/initialAdminPassword


*************************************************************

*************************************************************

*************************************************************
At this point, you can open the following URL in the browser and follow instructions on the screen:
https://localhost:8080/jenkins
(Note: replace “localhost” with the host name or IP address of your server)
We will go over the Jenkins configuration later in this post.
Installing Nexus
Download Sonatype Nexus Repository Manager OSS 3.xx from the Sonatype website.
You will need the Unix archive version (latest-unix.tar.gz).
Just like we did with Tomcat, unpack the Nexus archive to the /opt directory and create a symbolic link for the sake of simplicity:
$ cd /opt/

$ sudo tar zxvf ~/Downloads/nexus-3.11.0-01-unix.tar.gz

$ sudo ln -sf nexus-3.11.0-01 nexus
Just like with Tomcat, we will create a dedicated user and group for Nexus process:
$ sudo groupadd nexus

$ sudo useradd -M -s /bin/nologin -g nexus -d /opt/nexus nexus

$ sudo chown -R nexus:nexus nexus-3.11.0-01 sonatype-work
And just like with Tomcat, we want our Nexus to start automatically when the system boots, so we’ll create a systemd unit file for it:
$ sudo vi /etc/systemd/system/nexus.service
Copy and paste the following text:
[Unit]

Description=nexus service

After=network.target


[Service]

Type=forking

LimitNOFILE=65536

ExecStart=/opt/nexus/bin/nexus start

ExecStop=/opt/nexus/bin/nexus stop

User=nexus

Restart=on-abort


[Install]

WantedBy=multi-user.target
Activate the service with the following commands:
$ sudo systemctl daemon-reload

$ sudo systemctl enable nexus.service

$ sudo systemctl start nexus.service
After starting the service, verify that it has started successfully.
$ tail -f /opt/sonatype-work/nexus3/log/nexus.log
The tail command verifies that the service has been started successfully. If successful, you should see a message notifying you that it is listening for HTTP. By default, it will be listening on port 8081.
Installing a Version Control System
The GitLab installation on CentOS 7 process is described here: https://about.gitlab.com/installation/#centos-7
The Atlassian BitBucket process is fairly trivial. A prerequisite is git version 2.2.3 or higher. Let’s install it using the following commands:
$ sudo yum install -y http://opensource.wandisco.com/centos/7/git/x86_64/wandisco-git-release-7-2.noarch.rpm

$ sudo yum install -y git
Then verify the installation by checking the git version:
$ git --version

git version 2.14.1
Proceed with the installation of BitBucket.
Configuring Nexus
Navigate to https://localhost:8081 and sign in using default admin credentials (admin / admin123). You can change it later.
First, we need to create a proxy repository for the Mulesoft EE artifacts. Before you can proceed, you have to open a support ticket with Mulesoft and request credentials to access the EE repository. The credentials are issued per paid customer. (NOTE: If you are using Community edition, you can skip this step) For the purpose of this demo let’s assume our username is “modusbox” and the password is “muleftw”.
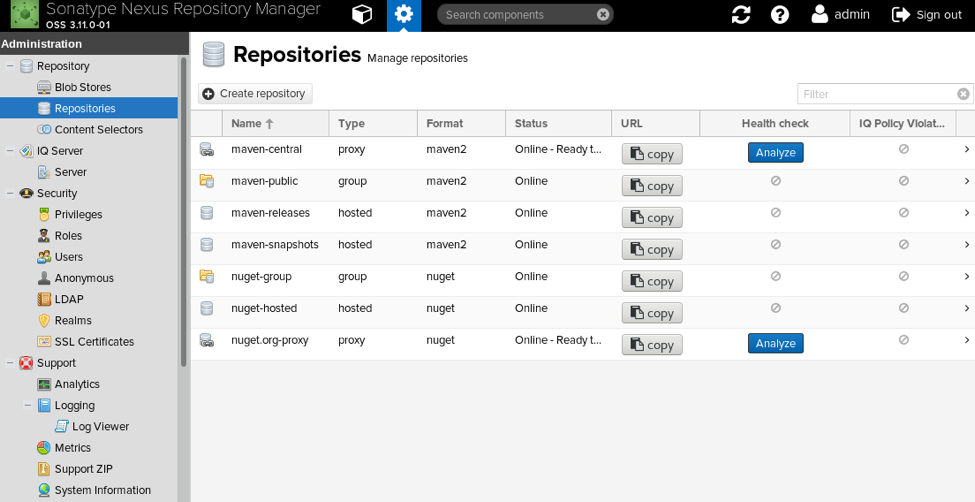
Click the “Create repository” button and on the next screen select the option “maven2 (proxy)”.
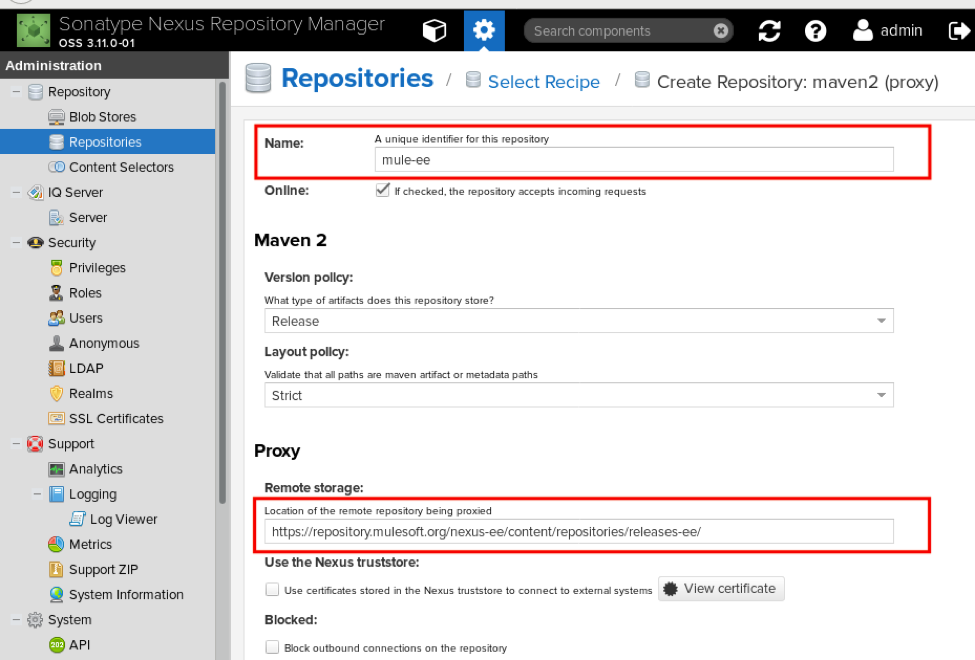
On the next screen, name your new repository mule-ee, set the remote storage URL to https://repository.mulesoft.org/nexus-ee/content/repositories/releases-ee/
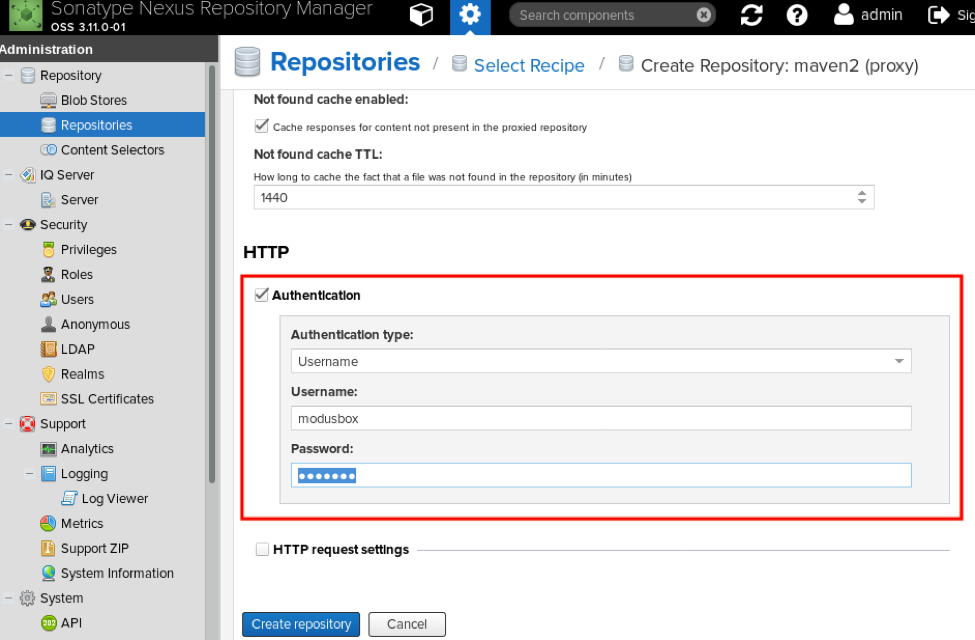
Scroll down to the HTTP section and check the Authentication checkbox, then enter the repository credentials you obtained from Mulesoft support.
Nex,t I’d recommend creating a hosted repository which will host third-party artifacts that are not available on public repositories (e.g. database drivers, SAP drivers, etc.) Let’s name it third-party. Repeat the above steps, but instead of proxy select the maven2 (hosted) option. Set the Version policy to Mixed and Deployment policy to Allow redeploy.
Configuring Jenkins
After the initial password was provided, Jenkins prompts you to install a number of plugins.
Make sure you install a plugin for the version control system you plan to use (i.e. BitBucket, GitLab, GitHub, etc).
After the installation of the plugin is finished, Jenkins prompts you to create a new user with job admin privileges and takes you to the main screen. At this point, I install another plugin called Multiple SCMs. While it’s deprecated and it is recommended that you use the Pipeline plugin, I prefer Multiple SCMs for its simplicity.
At this point, the basic DevOps server installation is completed. In the next series of blog posts, we will create a sample project with multiple modules and APIs, build it using Jenkins, and deploy to our Anypoint runtime environment.